


Flask -- Mark Mikofski
Agenda
- Mini lesson on Flask apps with Bokeh plots
- Mini sprint contest to develop a web app from NREL developer API
- Miscellaneous odds and ends
Bokeh Plots
Intro
In my opinion, an interactive web application is fun way to share an analysis. I believe users create deeper, more meaningful connections when they explore data interactively. The goal of this tutorial will be to teach you how to quickly make a simple web application that you can use to share your data analyses online.
Requirements
You will need a laptop with Python installed for this tutorial. If you need to install Python, please download Anaconda 3.6-64bits before you attend this tutorial. During the tutorial we will use the following packags, so please install them in a new conda or virtual environment:
This is easiest with Anaconda:
(root) ~/Projects/myapp $ conda create -n myvenv python==3.6.3 flask bokeh jinja2 requests
(root) ~/Projects/myapp $ activate myvenv
(myvenv) ~/Projects/myapp $
Mini lesson
This mini lesson has 4 parts:
Most of the snippets and examples from this mini-lesson are in the The Hacker Within - Berkeley GitHub repository code examples folder here.
Flask
Flask is a micro framework for developing web
applications. A web app runs in a browser. The web server can be run locally on
your laptop, or it can be on a remote server. Making a Flask app is
surprisingly easy! Copy the following into a new file and save it as
hello.py.
from flask import Flask

app = Flask(__name__)

@app.route('/')
def hello():
    return 'Hello World!'

if __name__ == '__main__':
    app.run()
This creates a new app, that will listen and respond to the “root” url, or
/ with the callback function hello(). This decorated function can be called
a “route”. Now open a terminal window, browse to your app, and run it!
(myvenv) ~/Projects/myapp/ $ python hello.py
You should see the following in your terminal:
* Running on http://127.0.0.1:5000/ (Press CTRL+C to quit)
Open a browser and enter the url given. This url: http://127.0.0.1 is also
called localhost and the second number, 5000, is the port. You should see
“Hello World!”
in your browser. Congratulations! You’ve just written your first web app! Now
hit ctrl-c in your terminal to kill the app.
Bokeh
Bokeh is a Python library for making interactive
“D3” style plots using a imperative style like
Matplotlib (versus a declarative style like
Altair). Bokeh is ideally suited for embedding
plots in a web app like Flask. Let’s see how you can add a Bokeh plot to your
hello.py Flask app.
- Make a new folder called
myapp-0/ - Copy your old
hello.pyinto the new folder -
Change your new
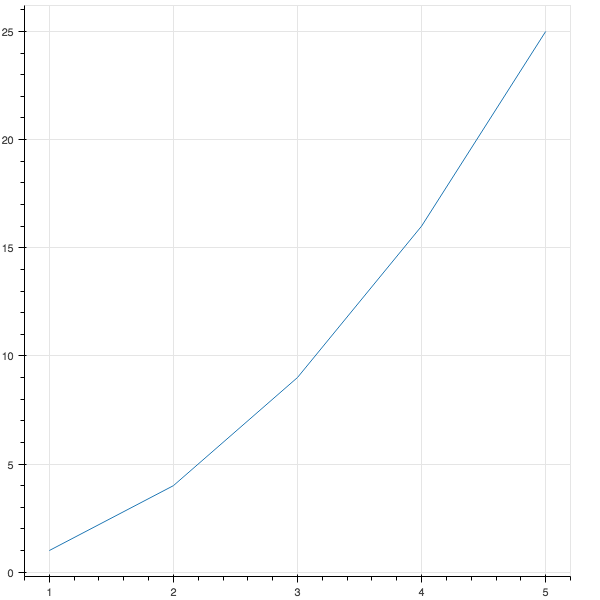
myapp-0/hello.pyfile as follows:""" My App 0: Hello with Bokeh plot. """ from bokeh.plotting import figure from bokeh.resources import CDN from bokeh.embed import file_html from flask import Flask, Markup app = Flask(__name__) @app.route('/') def hello(): plot = figure() xdata = range(1, 6) ydata = [x*x for x in xdata] plot.line(xdata, ydata) return Markup(file_html(plot, CDN, "my plot")) if __name__ == '__main__': app.run(debug=True) -
Open a terminal and navigate to
myapp-0/$ cd ~/path/to/myapp-0/ -
Activate your conda environment
myapp-0/ $ source ~/miniconda/bin/activate myenv -
Start the web app:
(myenv) myapp-0/ $ python hello.py - Open a browser to http://localhost:5000/ or http://127.0.0.1:5000/ and you should see a line plot that looks similar to this:
Bokeh gives you several interactive features for free!

- link to the Bokeh documentation
- pan, zoom, and reset
- save
- Finally hit
ctrl-cin your terminal to kill the app.
There are at least two ways to “embed” a Bokeh plot in an HTML document:
- HTML files: create a stand alone HTML file
- components: return the individual components used to embed the plot in any HTML file.
This example used the first method. In the next example we’ll use the “components” method to embed the plot in our own custom HTML file.
Jinja2 Templates
Jinja2 is a Python library for making HTML files with dynamic content that is rendered using a subset of the Python language. The Jinja2 markup is enclosed in curly-cue braces and can refer to variables and commands:
<!-- http://jinja.pocoo.org/docs/2.10/templates/#escaping -->
<ul>
{% for user in users %}
  <li><a href="{{ user.url }}">{{ user.username }}</a></li>
{% endfor %}
</ul>
attribution: snippet from the Jinja2 documentation
The HTML files with Jinja2 markup are called “templates”. Flask can use Jinja
to render content placed in a folder called templates next to your app. Use
render_template
to specify the name of the template file and the desird data as keyword
arguments.
Let’s modify our “Hello” app to use a custom template and Bokeh components.
- Create a new folder called
myapp-1/and copy themyapp-0/hello.pyto it. -
Create a
templatesfolder insidemyapp-1/and save the following file asmyapp-1/templates/hello.html:<!-- http://jinja.pocoo.org/docs/2.10/templates/#escaping --> <!DOCTYPE html> <html lang="en"> <head> <meta charset="utf-8"> <title>{{ title }}</title> <link href="https://cdn.pydata.org/bokeh/release/bokeh-0.12.14.min.css" rel="stylesheet" type="text/css"> <link href="https://cdn.pydata.org/bokeh/release/bokeh-widgets-0.12.14.min.css" rel="stylesheet" type="text/css"> <link href="https://cdn.pydata.org/bokeh/release/bokeh-tables-0.12.14.min.css" rel="stylesheet" type="text/css"> <script src="https://cdn.pydata.org/bokeh/release/bokeh-0.12.14.min.js"></script> <script src="https://cdn.pydata.org/bokeh/release/bokeh-widgets-0.12.14.min.js"></script> <script src="https://cdn.pydata.org/bokeh/release/bokeh-tables-0.12.14.min.js"></script> </head> <body> <h1>Hello!</h1> {{ plot_div|safe }} {{ plot_script|safe }} </body> </html> -
Now change
myapp-1/hello.pyto get the Bokeh components and render thehello.htmltemplate:""" My App 1: Hello with Bokeh plot and Jinja2 template. """ from bokeh.plotting import figure from bokeh.embed import components from flask import Flask, request, render_template, abort, Response app = Flask(__name__) @app.route('/') def hello(): plot = figure() plot.circle([1, 2], [3, 4]) plot_script, plot_div = components(plot) kwargs = {'plot_script': plot_script, 'plot_div': plot_div} kwargs['title'] = 'hello' if request.method == 'GET': return render_template('hello.html', **kwargs) abort(404) abort(Response('Hello')) if __name__ == '__main__': app.run(debug=True) -
Open a terminal, navigate to your app, activate your conda environment, and start your app:
$ cd ~/path/to/myapp-1/ myapp-0/ $ source ~/miniconda/bin/activate myenv (myenv) myapp-1/ $ python hello.py -
Open your browser to
localhost:5000and you should see your app with the titleHello!
above the plot.
In this example, we get the Bokeh components, plot_script and
plot_div and pass them to the template, hello.html using render_template.
The template must have several links and scripts to run Bokeh. These are placed
in the <head> section of the HTML file. PyData
generously provides a content delivery network (CDN) to provide these files,
but you can also download them and host them locally. There are 3 cascading
style sheets (CSS) with custom HTML and 3 JavaScript files with scripts that
Bokeh uses to make interactive plots.
Finally the template must have a <div> element where you want the Bokeh plot
to appear, and a <script> which has your data and the Bokeh JavaScript code
to make your interactive plot.
Bootstrap
Bootstrap is an HTML framework and component library of CSS and JavaScript files that takes the pain out of creative attractive content for folks who are not web designers. To use it all you have to do is put the CSS and Javascript links in your HTML. Follow the directions in their getting started introduction to see where to put thes links.
Mini Sprint Contest!
We’re going to have a mini sprint so that you can practice what you’ve learned. The goal will be to create an interactive Bokeh plot in a Flask app using data from the NREL Developer Network.
-
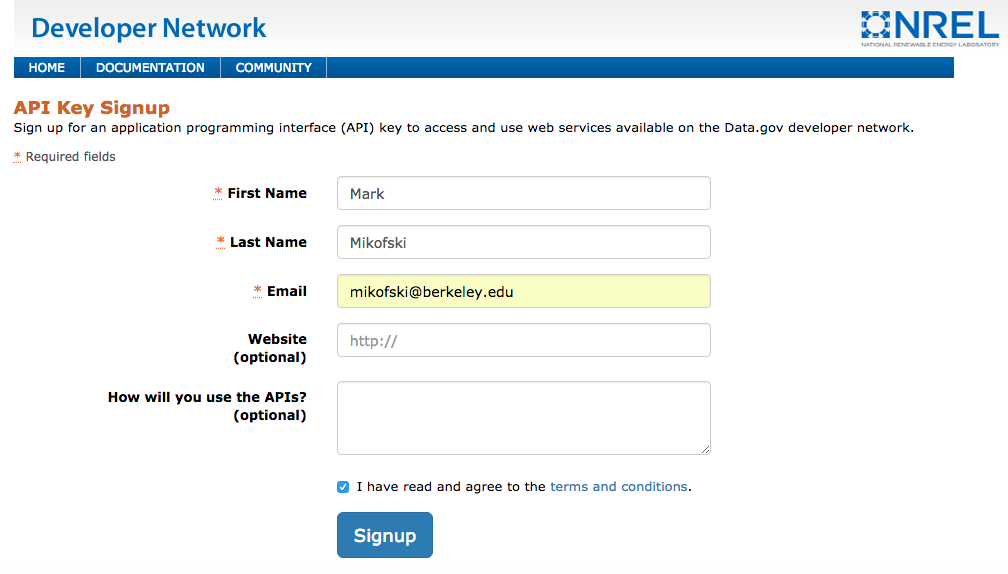
Go to NREL Developer Network and register for an API key.
-
Start your engines.
-
Go!
See Flask code examples for some ideas. (wip)
Miscellaneous odds and ends
There are lot’s of other rabbit holes to jump down. Here are a few.
HTML, CSS, and JS
Understanding HTML 101 will make building your web app or generating static content much easier. But understanding HTML is just the tip. You may quickly find yourself dabbing in CSS and JS too. Embrace it. But beware of misinformation - avoid W3Schools and go straight to the horses mouth. Mozilla invented the internet, not Al Gore, (j/k) so when if you need to find out anything about HTML, CSS, or JS, always check the Mozilla Developer Network (MDN) first!
Other HTML/CSS/JS frameworks
Writing your own CSS and JS is tiring. Making it look good, unless you’re a pro, is nearly impossible. These frameworks make it easy to look like a pro.
Static content
If you only need to generate your report once, or only occasionally, then a static site is fine. Your plots can still be interactive, static just means that the content on the site doesn’t change. A static site generator creates HTML, CSS, and JS content from some other markup like Markdown or ReST. Some hosts also offer static site generation and content management. And there are some tools that can generate static content in the form of HTML even though that’s not their primary function.
- GitHub Pages and Jekyll
- Pelican
- Sphinx
- Jupyter
- Markdown
- HTML/CSS/JS
- Bokeh, d3, Vega, and Vega-Lite
- Blogger, WordPress, and WordPress.com for hosting
Web frameworks for dynamic content
If your site depends on user input or if you want your site to update automatically with input from another source like an API or database, then you will need to use a web framework and a web server. A web framework combines the most common features from most web applications into a boilerplate design. Additional features can usually be added with extensions and plugins. Some frameworks are simpler than others, and some come with everything included.
AJAX
There is this crazy middle ground between static and dynamic content where you get content and modify the DOM using AJAX directly from the browser. This is way beyond the scope of this tutorial.
Web API
This is a web app that has a published interface or schema that users can use to programmatically interact with the application without a browser. There are serveral frameworks extensions that can be used to create a web API.
Embedded ploting libraries
Database object relational mapper (ORM)
If your web interacts with a database, then you should use an object relational mapper. This tool converts native objects into database records and generates database operations like SQL queries from native methods in the background, making it simpler to create, read, update, and destroy data.
Hosting
If you want to share your site, or have it visible outside of your network then you’ll need a host. Beware, once your data is public it’s on you to keep it secure. Web frameworks will handle the most obvious threats, but you still need to use common sense. Robots continuously crawl the internet and automatically attack anything new that they find, regardless of how insignificant it is.
Warning: If your application will require authentication, then you must use HTTPS!
- Heroku
- AWS
- Google App Engine
- Azure
- local network or intranet
Web servers
Hopefully, you probably won’t have to deal with setting up a web server, since this is usually handled by your hosting service, but it’s useful to know about web servers at a high level. Typically you will see a WSGI server, WSGI is a protocol for passing content to and from Python, and a web server that offers the content to web browsers requesting it and accepts content from browsers that send it. Most WSGI servers combine both of these but a dedicated web server can offer more features and better performance. It’s not uncommon for a single web app to be simultaenously running on several web servers and several WSGI servers behind a single load balancer that also offers a CA-certificate and port forwarding from HTTP (port 80) to HTTPS (port 443) to secure your site.
REST
In order for your application to run on several servers simultaneously, it needs to be RESTful. REST stands for representational state transfer and basically means that your app is stateless. In other words all of the information that the servers need to run your app is contained one of three (or maybe four) places:
- request header
- query string
- URL
- (maybe a cookie or other client side cache that is used for client side operations only, eg: with JavaScript)
Glossary
- DOM = document object model
- HTML = hypertext markup language
- CSS = cascading style sheets
- JS = JavaScript - it has nothing to do with Java, used to manipulate the DOM from the browser.
- REST = representational state transfer
- URL/URI = universal resource locator/identifier
- HTTP = hypertext transfer protocol
- HTTPS = with SSL or TLS
- SSL = secure socket layer was replaced by TLS
- TLS = transport layer security
- WSGI = web server gateway interface
- ORM = object relational mapping
- MVC/MVW = model-view-controller or model-view-whatever
- SQL = structured query language
- API = application programming interface
- AJAX = asynchronous JavaScript and XML - used for client side requests
- CORS = cross-origin resource sharing
- CRSF = cross-site request forgery
- JSON = JavaScript object notation
- XML = extensible markup language